Edible Garden Plans 2011

My cousin Todd, owner of Combs Landscape Design, came over to talk about our garden last week. He encouraged me to think of the backyard as a room with 'walls' of fence and house to be decorated with wooden panels painted by Lil. He advised us to expand the number of garden beds and arrange them in a funky mixed up way to complement the kid friendly decor coming soon. Thanks to intern Keara and nice weather at the end of last week, we got right to the work of building new beds. We also moved a bed from the chicken run to the open sunlight. We are adding 41 sq feet of growing space for a total of 184 sq feet in raised beds.

I hung myself and my expensive camera out an upstairs window to take the picture below. Don't worry, Dad, Alex was right behind me ready to call an ambulance if I fell. Later I used my favorite online editor Picnik to add text that shows exactly where we will plant everything.

central ohio garden plan picture

Lil had the brilliant idea to add more fruit trees to the chicken run to provide the hens with shade and grow something yummy out of reach of the hungry birds. A dwarf apricot and pear are on their way to us from Stark Brothers. We will also move some raspberry bushes from a shadier part of the yard to take advantage of the sunlight.

Before May 15, we need to get dirt in the new beds and shore up some of the others. We'll set Lil to painting as soon as we get home from New England. Todd has an idea to paint the fence to highlight the 'wall' concept. We also have plans to move Lil's playhouse and make a patio on the shady side of the yard for al fresco dining and grilling, which will also call for moving some landscape plants.

Oh, and did you spot the deadly garden label? Alex will share about his pet project next week.

What are your gardening plans for 2011? If you are a beginning grower, be sure to download my free Grow Your Garden ebook.

Grow Your Garden Free Ebook!

grow your garden free ebookThere is nothing I love more than planning gardens. There is such anticipation in the planning: what will grow, what new things do I want to try, what do I love to eat? I casually advise friends and family, occasionally drawing up a whole plan. Last year I attempted to inspire beginning growers with a series of basic edible gardening articles I published on this blog.

This year, I collected and expanded those articles into the Grow Your Garden ebook. Because I dream of a world with a garden in every backyard, I am making this ebook free for all!

Download your copy by visiting the ebook page. Feel free to tell your friends and family too – free downloads are unlimited.

All I ask in return is that you gently tend a piece of earth and savor the edible results. Share your plans, challenges and triumphs with me by email, in comments on Hounds in the Kitchen, or on the Hounds in the Kitchen Facebook page.

To bigger gardens, Rachel

PS. I just added a donation button if you want to support future educational endeavors of Hounds in the Kitchen. Look for it under the picture of me cooking on the right hand side of this site.

Building Garden Beds

grow your garden: raised bedsNow that you've decided what to plant and where to plant, it's time to build your beds! The most basic technique for creating a garden bed is double digging.  As the name implies, double dug beds are carefully turned with a garden shovel once over the whole surface.  Some peat moss and/or compost can be sprinkled on top and then the whole bed is dug again.  Each round of shoveling should be at least four inches deep.

Our strawberries, garlic, and kale are all relegated to double dug beds.  It takes me approximately 1 hour to double dig a 4 foot square bed.  My body is achy for a few days after because double digging is hard work!!  We line the beds with rocks or bricks if we have them to provide a visual reminder to little feet that plants are growing there.

double dug bed, lavendar

A tiller will do the same job as a double digging in far less time with less effort.  Most of us backyard gardeners do not have a gas powered tiller easy accessible, but they can be rented.  We have never chosen a tiller to avoid the rental fee or the hassle of transporting it.

empty raised bed
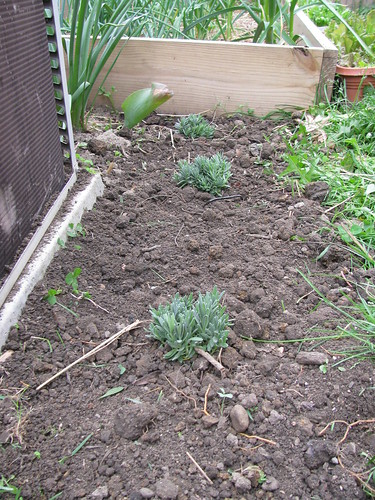
The next common bed style is the raised bed.  Here, sides are built from lumber and dirt is filled in the top.  The Pioneer Woman has a great tutorial for building your own raised bed.  We follow a similar procedure except we use 2x8 or 2x10s instead of using two layers of 2x4s for the sides.

Sides may be built from treated or untreated lumber, recycled plastic lumber, or cement blocks. Cedar is a naturally occurring wood that resists rot.  Plastic lumber will last for a very long time, though it is heavy and costly to transport initially.  Cement blocks are a popular choice at community gardens because they can be easily reconfigured or moved.

Some publications will tell you to avoid treated lumber at all costs. I was skeptical so I asked Alex, a material scientist by education and profession, to review research about the safety of treated lumber in the garden.  He concludes that vegetables grown in treated lumber beds do not uptake the chemicals in treated lumber.  While I still have hesitations about the worker safety of those who make treated lumber, we do use it for our raised beds because it is the cheapest long lasting material.

To anchor or not to anchor?  Many plans recommend digging 6 to 12 inch holes and setting posts in them to anchor the sides of the raised bed.  Others use stakes.  We subscribed to this philosophy for the first few beds we made.  It's not that hard, but we questioned why it was necessary.

unanchored raised bed
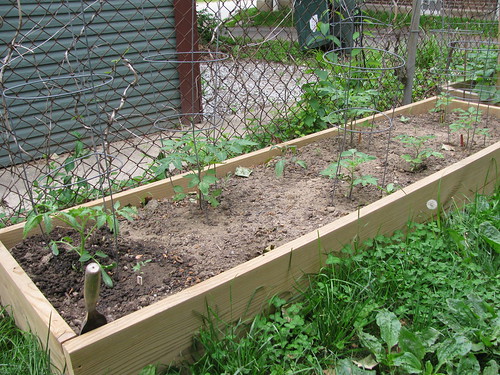
In our second round of bed building, we skipped the anchors.  In our experience, the raised beds sides do not bow or move.  The weight of the soil holds everything in place just fine.  If you are looking to save some labor and cost, skipping the corner anchors might be a good choice.

Soil for raised beds can be purchased from a plant nursery, the city, or a dirt and mulch company.  If you have a hearty compost bin you can use that too.  Last year we filled our beds with soil 'thrown' from the Jones topsoil Slinger truck.  We mixed in our homegrown compost and some peat moss too.  This year we will purchase some compost from Denise at 2Silos farm.

If double dug and raised beds aren't your style, there are alternative beds.  You might plant in a bucket, straw bale, or potato tower.  The most recent edition of Mother Earth News details a simple soil bag plan.  Several companies make raised bed corners or corners and sides that gardeners need to simply assemble.

Are you building new beds this year?  How are your existing beds made?

Starting Seeds

There are oodles of books about starting seeds from people far more qualified than me to be dispensing advice.  If you really want to know everything, I suggest searching out references at your local library. What we do here is a casual process guided mostly by the backs of the seed packets and our own yearning to be outside.

Indoors we will soon start some peppers, tomatoes, and herbs.  Our setup is a simple plastic tray with peat pots and a hardware store fluorescent light suspended on top.

As soon as we can work the soil, around the end of March, we will sow potatoes outdoors in our potato tower (post in progress).  Peas, shallots and greens will come soon after in early april.  Greens can be started indoors but with our limited seed starting space we just start them outside.

This year we'll add asparagus to the garden and sow the crowns sometime in mid April.  They need deep and well drained furrows according to the OSU extension fact sheet.  The extension publishes fact sheets on most varieties of home garden vegetables and are worth a look.  They are hybrid and chemical proponents, so just ignore that advice if you are going for a more natural approach.

Everything else will be direct sown around May 1.  The traditional frost free date is May 15, but I am usually willing to take the risk by May 1.   I cover beds with old sheets for the night if there is a late frost.

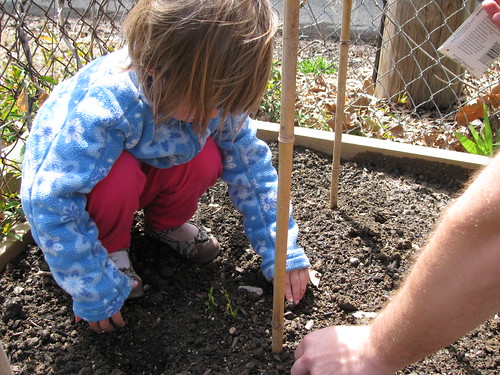
Direct sowing is one of Lil's favorite garden projects.  She is good at punching her finger down to make holes and covering the seeds back up.  We label rows with old plastic silverware, popsicle sticks, or whatever else is available.  I lust after reusable metal row markers.

Around mid May there's an inevitable trip to the garden center and we can never seem to resist buying a few more seedlings.  This year we plan to visit Jon Fisher tomato greenhouse on the recommendation of neighbors to add some variety to our tomato plantings.

We sow many seeds two or three weeks in a row to extend their production.  Peas, squash, beans, carrots and greens are all good candidates for this.  In the fall after early season vegetables (peas, broccoli, greens) have gone by, we will sow late season vegetables like carrots, beets, chard, kale, and lettuces in their rows.

To keep everything in order, I generally arrange seed packets in a box based on their planting date.  I put them at the back of the line after they are planted.

A friend just shared this awesome planting calendar calculator.   I will probably  print a copy for the seed packet box so I don't have to keep everything in my head.

What's your seed starting plan?

Planning Garden Location

Location is the next consideration for  gardens after motivation and plant selection.  The ideal location will have 6 - 8 hours of sunlight a day, access to rain barrel or hose water, and convenience to the kitchen. In less than ideal locations or apartment dwellings, look for sunny spots where you can locate movable containers. To choose a location, observe the sunlight over a few days.  Generally, yards on south facing sides of structures will get more light in Ohio. Be sure to consider side yards and front yards as planting locations.

Trees not only reduce sunlight but dense roots make planting difficult.  Further, walnut trees release a tanin through their roots that kills nightshade family plants including tomatoes and green pepper.  Choose a location as far from trees as possible.

When picking the place for your edible garden, choose the size of your beds at the same time.  Ideally, beds will be no more than 4 feet wide to allow for easy access when weeding and harvesting.

How much space do you need? It varies.  I'm willing to bet that once you start gardening you will always want more beds.  For your first garden, 40 - 50 square feet will go a long way.

I like to visually draw my garden.  Plan Garden has an planner that makes and stores your plans online.  It costs $25/year.  An alternative is to download Garden Planner, which is free for 15 days and $20 to purchase.  Pen and graph paper are also great!

The Grow Your Garden assignment this week is to choose the location for your garden.  Draw your bed(s) and begin to envision your new landscape.

I had every intention of sharing a video look at my garden beds with you.  Nature had other plans, however, and my beds are covered with a foot or more of snow!  Below is a quickie outline I made of the garden as it stands now.  We plan to demolish our deck and add another two or three beds this spring.

Don't forget about the seed potato group buy!  I'm collecting orders until February 23.

Grow What You Want To Eat!

grow your garden basic seriesIn the introduction to my Grow Your Garden series, I shared reasons people garden.  I hope you have nailed down some inspiration because now it's time to plan in earnest! My first principle of garden planning is to grow what you want to eat.  This sounds simple, but sometimes people plant what's available or what their mother planted but it's not something they actually want to consume.  Just last year, we planted a big row of radishes.  After harvesting just a few plants we determined we don't actually eat them and gave away the rest.

Next, consider what will grow well in the conditions and space you have.  Below are some suggestions:

Plants ideal for containers:

  • lettuces
  • greens
  • herbs
  • tomatos and peppers (BIG containers)

Plants well suited to small spaces:

  • kale
  • chard
  • radishes
  • garlic
  • beets
  • herbs
  • lettuce

Plants which can be trellised vertically:

  • peas
  • beans
  • cucumbers
  • squashes
  • melons

Excellent producers in Ohio conditions:

  • tomatos
  • cucumbers
  • beans
  • summer squash
  • zucchini
  • kale
  • chard
  • peppers
  • raspberries

So, make a list of which fruits and vegetables you love to eat and want to grow.

Next it's time to purchase seeds!  I recommend looking through an online or print seed catalog like to determine which varieties you like.  I have been very happy with the seed quality and customer service of the Seeds of Change online store.  Heirloom varieties typically grow very well in the home garden.  Many gardeners prefer non hybrid seeds so that they may save seeds for the following year.

seed packets

If you have the chance, ask a gardening friend or neighbor if they have any seeds to share.  Most of us gardeners have a huge collection of seed packets we are more than happy to share.  I have yet to use old seeds that don't germinate, but I do recommend planting a few extras if you are using dated seeds.

If this is your first year gardening, consider purchasing seedlings instead of starting seeds indoors.  Seed starting is not hard, but it does require significant time and money investment.  You will probably want to focus those resources on building beds.

Many seeds will be directly sown in the ground, such as peas, beans, lettuces, greens, onion sets, potatoes, squashes, and sunflowers.  These are perhaps the easiest to grow because you just dip seeds in the soil and watch them produce.

This year I am growing potatoes, onions, garlic (already planted), winter squash, tomatos, peppers, spinach, four season lettuce, beets, quinoa, basil, oregano, sage, thyme (hoping it overwinters), two kinds of beans, peas, and pumpkin.  Please don't let me forget to plant pumpkin.  Of these, the only seeds I will purchase are quinoa, a beefsteak type tomato, and potatoes.  If you also want to grow potatoes, look for my next post about our group seed potato buy!

What do you plan to grow?

Next in the series, I'll share advice about planning your garden beds followed by seed starting.