Homemade Low-Cost, High-Character Cold Smoker Contraption

Today I will reveal the second craziest homemade cold smoker ever created. It was born from a desire to cold smoke a molasses cured, home butchered ham without breaking the bank and inspired by the craziest homemade meat cooking devise, my father's Hillbilly Ham House.

Behold Alex's Cold Smoking Contraption.

cold smoking contraption

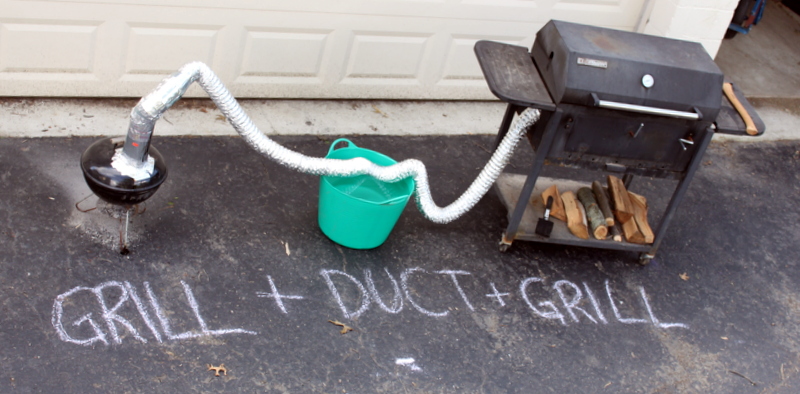
To build this beauty, Alex started with a gifted excess mini Weber grill and removed the top vent. He arranged a length of round furnace pipe acquired for $3 at the Habitat ReStore into the hole, followed by a $5 length of flexible dryer vent. Connections were reinforced with aluminum duct tape, $5 a roll.

mini weber cold smokersmoker vent

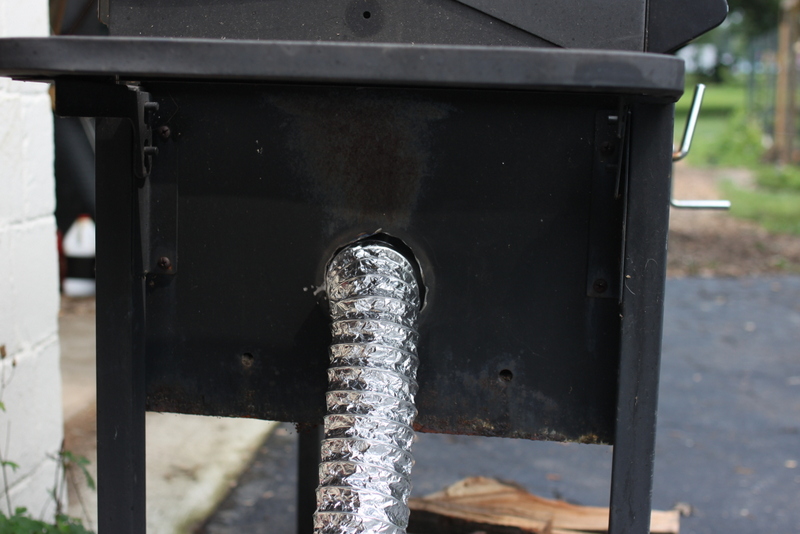
The dryer vent ran into the modified lower vent of our existing large charcoal grill. Alex used the angle grinder and many curse words to extend the hole enough for the pipe to fit in properly. The grill remains usable to cook off meat with charcoal.

Useage is simple: Build a small wood fire in the mini Weber. Put the meat on the big grill and monitor temperature. After 18 hours, you have ham!

The dryer vent was incapable of handling the smoke heat for the duration and melted through once. Alex cut off the effected part, reattached with tape, and went about the smoking. A more permanent solution would be durable flexible hosing or connecting pieces of furnace pipe.

home cured ham over ice

Cold smoking is the act of surrounding a piece of food with smoke but little to no residual heat. The ideal cold smoking temperature for a ham is 60 degrees F. Given that the air temperature in summer is generally higher than 60, adjustments can be made. We kept a pan of ice in the base of the meat chamber to help keep cool and were able to average about 75 degrees F.

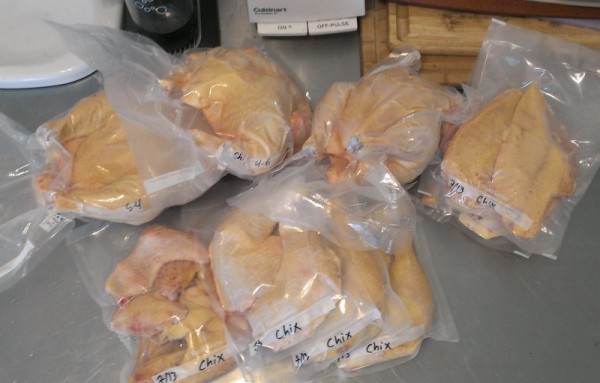
Alas, our basement is still a little too warm for dry curing, the next step in the ham Alex wished to make. We ended air drying early before mold set in and packaged the ham in slices and chunks for the future. Someday we'll learn that hams are not meant to be made in July.

What do you think of Alex's creation? DIY genius or a bunch of junk?

PS. For classier Weber modifications, head over to our friend Dave's site Webercam.com.

Pea Shoot Pesto {Recipe}

pea shoots in pesto recipe

Pesto is the simplest sauce in the world. All you need are fresh herbs, a little salt, and oil. Basil is traditional but you can use any seasonal herb. You can even use a mortar and pestle or lots of knife work instead of a blender or food processor.

And yet, there are secrets to making a bold, balanced pesto.

First, don't skimp on the fat. Oil creates a smooth texture while holding the color and flavor of the herbs. Use high quality oil because the flavor comes through the final product. Oil also tones down the strong flavor of the greens. To prevent freezer burn, top a container of pesto with a layer of oil before freezing.

Always add a little acid. A splash of lemon juice or vinegar balances the richness of the oil and preserves the color.

Experiment seasonally. Basil pesto is a classic in the summer but don't leave pesto behind in the other seasons. Play with spinach and kale in the fall and microgreens in the winter and spring. I developed this recipe for customers of Swainway Urban Farm to sample at the farmers' market. Simply adapt the recipe below to your ingredients on hand!

pea shoot pesto recipe

Pea Shoot Pesto Recipe

2-3 garlic scapes (1/4-1/2 cup) or 1-3 cloves garlic 1 bag (2.5 oz) fresh pea shoots 1/2—1 teaspoon salt 1/3 cup olive, grapeseed, or sunflower oil 1 teaspoon white or rice wine vinegar

1. Wash scapes, removing both ends, or peel garlic. Chop roughly. 2. Place garlic, peashoots, and salt in food processor or blender. 3. Blend, drizzling in oil and vinegar as the mixture purees to your desired consistency. 4. Serve as a dip with veggies, spread for bread, or sauce for pasta. 5. Store in the fridge with a light covering of oil for up to ten days or freeze for future use.

Cradling Chaos

IMG_6768Let's review the last week, shall we? Monday - Rachel worked 12 hours shepherding 86 Japanese exchangees from the airport to a hotel in two batches. Alex and Lil ran errands and maintained the home front.

Tuesday - Rachel worked another 12 hours orienting said exchangees to the ways of American life. Alex and Lil visited to meet the college student, Yukari, who would be staying with us after Alex teleworked a full day from home.

Wednesday - Rachel spent 8 hours getting Japanese students on their way to host families around the state. Meanwhile, our friend Uncle Leonard and his partner Gina arrived and began construction on a new mud room with Alex. In the afternoon, Rachel and Yukari came home, relieved the house of the 'Mess When Mom's Not Home', went to the grocery store, and made a from-the-garden from-scratch dinner.

Thursday - Alex and Len continued work on the porch all day while Alex simultaneously smoked pork shoulder and bacon. Rachel seeded fall vegetables and fed the crowd lunch and dinner from scratch. Later, she and Yukari went to a budget meeting with staff of the School For Young Children (SYC). On the way home, they picked up Jeni's Ice Cream for a pre-birthday celebration.

Friday - Alex's working birthday! Rachel, Lil, and Yukari toured SYC in the morning while Alex and Len worked madly to finish the roof of the mud room before expected rains Friday night and Saturday. When Rachel and the girls returned home, they cooked lunch and then mac and cheese and shredded cabbage for the following day. In the late afternoon, Rachel, Yukari, Lil, and Gina caravanned with Rachel's sisters to Legend Hills Orchard for some peach and apple picking on the way to help their cousin move. They returned home at 9:30 after moving and eating dinner with extended family.

Saturday - Rachel sold magnificent mushrooms (locally foraged chanterelles, people!) for Swainway Urban Farm while it rained for hours. Meanwhile, Alex baked 72 buns from Dave's perfect bun recipe. When Rachel returned, they braved drizzles to clean up the construction debris. Rachel's parents arrived as the rain stopped to set up tents, chairs, and tables. Rachel finished cooking, showered, and then the family welcomed 70 friends and family to a summer shindig with a local and from-scratch meal of pulled pork sandwiches, homemade bbq sauce, home-grown coleslaw, homemade macaroni and cheese, creamy cheese tarts with Berryfield blueberries, house whiskey punch, and homebrew.

Sunday - Everyone slept in. Along with the rest of central Ohio, Rachel, Alex, Lil, and Yukari went to the state fair for Ohio 4-H International day. They left in time to eat dinner at Alex's parents.

Monday - Rachel squashed squash bug eggs, pulled weeds, and harvested ten pounds of split tomatoes for stewing. Yukari and Rachel began preparing peaches for peach jam. Alex and Len installed the last windows, walls, and a door to the mud room. In the afternoon, the ladies completed an epic souvenir shopping trip. After a dinner of backyard chicken, mashed potatoes, and salad, Yukari and Rachel went to City Folk's Farm Shop for the Home Ec potluck.

Chaos Is Our Way Of Life

In these heady days of summer when fruit is ripe, weeds are prolific, and projects beg for completion before cooler weather, our day-to-day feels like a string of never-ending madness. There's fun mixed in with the chores, though, and garden-fresh flavors reward our work. Our muscles are sore, minds racing with new ideas, and hearts full of love for the land and people we interact with.

We cradle the chaos. Like a tiny newborn who grows so quickly, we recognize that this busy season will draw to a close soon enough. We can rest later. Until then, we'll let produce and projects full the long sunny days.

Score Squash Now For Fun Autumn Scarred Squash

Last year I saw Jamie Oliver post an amazing Halloween display with scarred squash. I booked marked the idea in my mind and am now scoring all our volunteer squash plants. All you need is a sharp knife blade or skewer and a young winter squash. Without removing the pumpkin, butternut, or other variety squash from the plant, score a design lightly into the skin of the squash.

scored squashscarred squash

Then, let the plant grow. It will weep a little liquid in the first twenty four hours and then begin to form a brownish scar. As the squash continues to ripen and change color, the scar will balloon slightly but stay brown.

This intervention could potentially weaken or draw disease to the fruit but thus far our scarred squash are growing just the same as the non-scarred fruit on the same plants.

scarred pumpkin

The possibilities for these decorations are endless. We've drawn shapes, jack-o-lantern faces, initials, and messages that we'll show off later in the season. And the best part is that the scarred squash will still be edible!

Are you already thinking about autumn? If you're looking for a few gardening ideas, try signing up for my Fall Gardening class where we'll talk about autumn crops, cover cropping, and season extension.

Creepy Meats - On Raising Cornish Cross Meat Chickens

The story below contains details about the process of raising meat chickens but no graphic images or descriptions of the slaughter.cornish cross chick

My friends Ohio Farm Girl and Lyndsey Teeter refer to Cornish Cross meat chickens as 'creepy meats'. I had no idea what they were talking about and blindly ordered six chicks to try our hand at raising meat on our very own property.

In four weeks the tiny chicks ballooned into squishy, barely feathered tweens bigger than the laying hens we had been raising for eighteen weeks already. They didn't forage, cluck, respond to us, or even kick up the grass under their chicken tractor. Creepy meats have exactly three tasks in life - eat, drink, and poop.

Caring for cornish cross chickens took us less than 15 minutes a day, whereas Lil typically spends an hour visiting, feeding, watering, and collecting eggs from the hens. The creepy meats had no personality to enjoy or activities that required our input.

When they were six weeks old, we began to discuss their demise. We weighed one and decided they could probably eat for a few more weeks to put on more weight and make our plucking time worth it.

By eight weeks, our cornish cross chicks could barely waddle up the ramp to the roost at night. Their eat-sleep-poop routine had become so vigorous that we were moving the tractor every two days to prevent them from laying in their own waste. It was time.

full grown cornish cross chickens

The Butchering

"Are you butchering them yourself?" friends and family asked. Of course. We're practiced in chicken slaughter and believe in the process of meeting your meat. Besides, with the cost of all the other inputs (see below), it didn't make financial sense to drive them to pay a processor.

On Sunday morning, we set up a borrowed homemade cone on a ladder with catch bucket underneath. Next to that was our propane turkey fryer with a pot of water. Then a table with sharpened knives, waste bucket, towels and cutting boards. Finally we had a bucket of cool water for rinsing/chilling and a cooler of ice.

butchering cornish cross chickens

The process was quick: Alex did the deed, I plucked, he eviscerated, and I cleaned up. With interruptions to console Lil (she didn't like the squawking the birds made when we picked them up, nor the after-life shaking), processing six birds took an hour an a half from setup to cleanup.

We left the chickens buried in ice for twenty four hours to go through the rigor mortis process. The next day, we vacuum sealed three whole chickens and three in pieces. Alex made pate from the liver and stock from the feet, necks, and scraps.

cornish cross chicken meat packaged

Raising Meat Birds By The Numbers

$15 for five chicks plus one bonus chick for no charge $0 gas because a friend nicely did the driving for a jar of sourdough starter $61.50 for 125 pounds of non-GMO local feed 20 wheelbarrow loads of free woodchips spread over the waste so flies wouldn't set in 90 minutes processing $5 ice and vac bags 24 pounds of chicken in the freezer 3/4 pint liver pate 8 1/2 pints stock

Total cost: $81.50 (not including our time or existing equipment like tractor coop, processing tools, vacuum sealer) Price per pound: $3.02 (counting pate and stock as 3 pounds of meat)

We Won't Raise Cornish Cross Again

Cornish Cross meat birds are amazing grain-to-protein machines. No other breed is able to mature in eight weeks with such high quality, tasty meat.

However, we like chickens that do more than just make protein. We want birds that can provide a foraging and soil-turning benefit since the cost of raising them ourselves barely saves a cent over buying from a reputable local seller. If they can add to the fun and beauty of the homestead, even better.

When the summer heat passes, we'll try another round of meat birds but they won't be Cornish Cross. The breeds we're looking at will mature slower but provide a value beyond meat, whether that's a taste benefit (Buckeyes), foraging/mowing (Freedom Ranger) or soil turning (both of the above).

Have you raised meat birds before? What was your experience?

PS. If you are interested in witnessing and learning how to slaughter a chicken, our friend Denise is hosting a hands-on butchering class through City Folk's Farm Shop.

Sharing Our Space

looking at topbar frame Harmonious Homestead was settled by generations of creatures and people before us. If we steward it well, our land will provide for many future families. Put in a historical perspective, "our" land only belongs to us for a moment and is acted upon by many other creatures while we're here.

And that's why we share it with sustainably-minded folks who want to help this space reach its potential.

beekeeper showing girl hive

Eve, whom Rachel met through a parenting group years ago, located a top-bar hive of bees here in the spring. The are thriving, visibly pollinating the vegetable plants and ground-covering clover. If she visits when we're here, she answers our questions about beekeeping and shares in our wonder about all the aspects of the life of bees we can't know.

Joseph and Jen, the growers of Swainway Urban Farm, had a few excess seedlings needing a place to put down roots in June. We offered up our front yard which Joseph tilled and planted in six sixty-foot rows, seen below just after planting. The 'Swainway Annex', as we're calling it, is growing food where there once was grass. We intended to experiment with dry farming two rows of tomatoes but the weather (a rather fickle homesteading partner) had other ideas and the rows are flooded at the moment. Hopefully the sun will dry up the water and ripen the fruit soon.

swainway annex row crops

Our families contribute moral support, creative and hard-working ethics, and occasional planting and harvesting help. Shawn and Gerry at City Folk's Farm Shop provide materials, hoop house help, and a venue for classes. Friends bring good cheer when they cavort in the natural playground and admire the chickens. Neighbors support us with inspiration, watchfulness and gifts of their excess.

beekeeper looking at washboarding

We always envisioned a communal homestead. When we work together like Eve's bees, we learn, find joy, and reap rewards that would not be possible if we toiled alone.

We want to share our space with you too. Please come see the goings-on at 1224 E Cooke Rd Columbus Ohio 43224 this Saturday, July 13, from 3-5 pm.

Our Dysfunctional Kitchen {Friday Five}

Live in Columbus and want to see the new place? Come to our open house next Saturday, July 13 from 3-5 pm. More details on the Facebook invite. There's one place in our house that I haven't dared to write about yet - the dysfunctional kitchen. It's an ugly space we use often. The back door to the house, the entrance we use most often, walks right into this room. Each time we host a dinner party or undertake a large preserving project, the 'heart of the home' reveals more design flaws. I could go on for days about what's wrong with our kitchen but I won't bore you with all the details. Instead, in the spirit of Friday Five, here are the basics of what we dislike most:

dysfunctional kitchen

1) Where's the other half? Our kitchen is spacious but only has counters and cabinets on two of the four walls, which leaves us lacking in storage and working space. We temporarily corrected the issue with a large stainless steel table from a restaurant supply store. But why, when there is a perfectly good dining room just through the doorway, did someone not install cabinets on all four walls?

layers of flooring

2) The ugly, ill-installed, tile floor - Tile is an abomination in a working kitchen. The hardness breaks every glass and dish that is dropped. It feels cold and bounces sound. Cold + hard = achy legs when processing a mountain of fruit, stock, or vegetables. Ours happens to have been installed by someone either inexperienced or lazy enough to not fully clean off the grout, so we have swipes of now-hardened grout on top of the tiles that collect mud and look dirty at the drop of a hat. On the upside, despite the five (!) layers of flooring, they all seem to be degraded enough that tearing them out won't be much of a problem.

unevenly cooked pancakes

3) The glass-top electric range - I could write a book about how much I despise electric, glass-topped ranges. Instead, how about if I list the things I could easily cook six months ago but now are either underdone or burnt or both every time I make them: popcorn, quesadillas, pancakes, eggs, bacon, grilled cheese. In what I think is an oft-repeated design flaw, this range has the controls on the back of the unit, requiring the cook to reach across steaming pots of water to turn down the heat.

4) Recirculating exhaust fan - Recirculating exhaust fans, the kind that most kitchens have attached to a microwave or just above the range, are worthless. They do nothing to remove heat or steam or smoke from the area. We'll have to move the range to the other wall to install an outside-venting fan but this is the only way that baking and canning in the summer is bearable to me.

little sink

5) The too-shallow sink - Our kitchen has a standard two basin ten-inch deep sink. Our needs, apparently, aren't standard because many of our pots didn't fit under the faucet until we replaced it with this number chosen for height. Our biggest cookie sheet doesn't fit width wise. There are always clean dishes spilling out of the drying basin. Large cuts of meat are nearly impossible to rinse and yes, we're still cure-deep in charcuterie. A deeper sink like my beloved old numerar doesn't take up much more space and is imminently more useful.

I feel a little guilty whining about a kitchen that many people around the world would love to cook in. Truly, we could live with this design and these appliances for many years if we needed to. But my aching legs tell me that if we're going to happily preserve the (hopefully) hundreds of pounds of food that we're growing, we could use an upgrade.

Fortunately we're starting to plan a DIY kitchen renovation. Did you know this blog started out documenting the renovation of our last kitchen? We've actually taken kitchens apart and put them back together in our two previous houses, so we're well aware of the effort the project will require. We'll document the process along the way and ask for your opinions too. Because while we're quick to solve the functional issues, we could use help with the finishes and designer-y options.

What bugs you about your kitchen?